Learn the science behind:
Torta Setteveli – Using Science to Make This Challenging Italian Cake
Making a complicated dish, with a lot of different components can be a true project to plan and execute. But it’s a great way to practice a lot of techniques in one go and learn something new. Generally I stick with slightly simpler dishes, focusing on one main skill, but this time I thought I’d mix it up and give a more complicated cake a try. This Italian creation, the Torta Settevelli (cake with seven layers), uses cake, cream, mousse, crunches and a mirror glaze to produce a delicious result.
Each component has its own pitfalls and challenges, so we’ll walk through them all one by one, digging into the science. Once you’re finished, you could almost say you’ve completed a science project ;-).
What is a Torta Settevelli?
Origin stories of dishes are often hard to verify, but the origin of the Torta Settevelli seems to be an exception to this rule. This is mostly because it’s a pretty recent creation! In the 1990’s (so less than 30 years ago only) the cake was developed by Italian chefs during a baking competition. It was a success, so much so that the original name was trademarked by the chefs who came up with the recipe.
Because of this trademark, you can find cakes that look very similar to the ‘original’, but aren’t called Torta Settevelli. They have had to come up with their own names.
On a side note, according to the Great British Bake Off (tv show) the Torta Settevelli is a traditional birthday cake. I’m doubtful of that, although, of course, since its inception in the ’90s it might well have become a birthday cake.
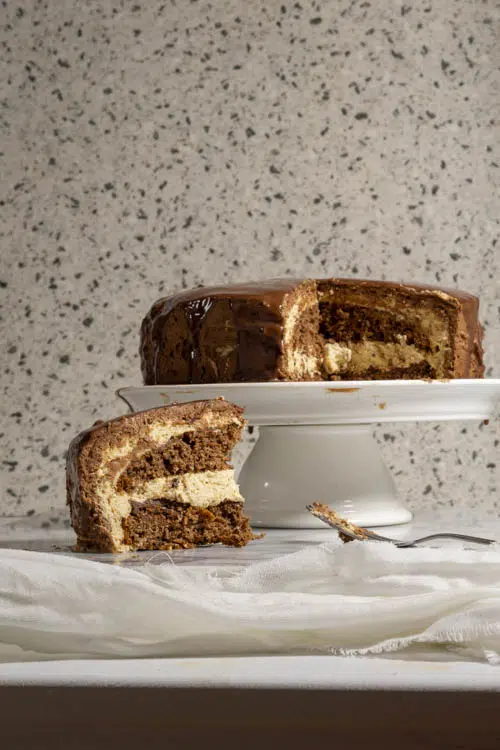
So what makes this cake special? First of all, there’s quite a few layers and thus components in this cake. A Torta Settevelli is made up of seven layers: 2x chocolate cake, 2x hazelnut cream, 1x hazelnut crunch, 1x chocolate mousse and 1x mirror glaze. As with any (traditional) food, there isn’t just one correct version, and you might find recipes with slightly different components than others. In those layers, the common flavor theme throughout is hazelnuts and chocolate.
The challenges of a Torta Setteveli
Seeing as how it as created during a competition, it is quite a complex cake to make. Once you eat it. all the different layers work really well together, making for a well balanced cake.
Seeing that there are 5 different layers, one of the main challenges of making a cake like this is time management. How do you make sure the right layer is done at the right time can be challenging.
Once you’ve planned your project out properly the individual components aren’t particularly complicated. Getting the timing right is probably most complicated, as you will see below. However, once you understand the three core scientific concepts of this cake, it becomes a lot easier to make and troubleshoot!
3 Core Science Concepts
- Controlling browning reactions when roasting hazelnuts & caramelizing sugar
- Using egg yolks, corn starch, gelatin, and chocolate to thicken and stabilize your layers
- Creating a glossy, luscious glaze on top
Apart from these more specific techniques, you will need to bake a cake and make a chocolate mousse. The cake is a pretty simple one (with some similarities to a Genoise). The chocolate mousse only contains two ingredients: chocolate & cream. you might wonder how hat mousse stays stable over time? Well, the chocolate hardens when it cools down, keeping the whole mousse in place!
Science Concept 1: Controlling browning reactions
Roasting hazelnuts
The major flavors of a Torta Settevelli are chocolate and hazelnuts. Nuts are flavorsome by themselves, however, there is potential for a lot more. It is why one of the first steps in making the torta, is to bring out those nutty flavors by roasting the nuts. The heat not only browns the nuts, it also causes a wide variety of chemical reactions to occur that make all sorts of delicious flavors.
The ‘culprit’ for all this deliciousness? The Maillard reaction. This complex set of chemical reactions browns your hazelnuts beautifully at the start.
Of course, don’t take it too far. Burned flavors become so bitter that they’ll overpower the more delicate nutty flavors.
You can roast nut in a variety of ways, in an oven, or a frying pan for instances. In all cases the chemical processes are very similar, what changes is just how the heat is distributed around the nuts and how evenly (or uneven) the nuts may be roasted.

Caramelizing sugar
If there’s a cooking skill that’s a true food chemistry experiment, it’s caramelizing sugar. When you caramelize sugar you transform the white sweet sucrose crystals into a brown, slightly bitter, complex mixture of molecules.
Theoretically, caramelizing sugar is easy. Once you heat sucrose to above approx. 150°C (300°F) the sucrose will start to turn brown. Again, a complex series of chemical reactions occurs, which results in brown colors and lots of flavors. The longer you heat it, the browner it gets, and the less sweet and more bitter it becomes.
Fixing clumping!
In reality, caramelization can be tricky because of crystallization. When you’re heating the sugar (sucrose) in a pan, it might start to form crystals and clump up. Once it’s clumped up it becomes very hard to heat evenly. The more you stir and move the sugar while heating it, the bigger your chances of it crystallizing. Luckily, this mistake is easy to fix. Just add some extra water to redissolve all the sugar, and re-heat until it start to turn brown.
When you caramelize your sugar you need a way to quickly and easily cool down the caramel once it has turned brown enough, to prevent it from over-cooking and burning. In this torta settevelli, you do this by adding room temperature hazelnuts to the caramel. The hazelnuts cool the caramel down and prevent it from burning. Also, it will harden the caramel, so make sure to poor the caramel + hazelnuts from the pan soon after!
Grinding nuts
For a Torta Settevelli, you will want to make a nutty, slightly sweet hazelnut paste. You’ve started it by mixing the roasted nuts with the caramel. Next up is grinding this mixture. Whereas there’s not a lot of science involved here, you might be wondering how you manage to get quite a smooth puree out of the mix. Nuts (including hazelnuts) contain a lot of fat. When you grind the nuts this fat is released, making a smooth paste, just like you do when making peanut butter.
Science Concept 2: Thickening liquids
In a torta settevelli, you’re thickening and stabilizing a lot of liquid components. You’re transforming otherwise liquid components, into components that can hold their shape on a cake. Once you look at your components with this lens, they become more predictable. We’re going to look at three mechanisms that you use:
- Using egg yolks and corn starch
- Using gelatin
- Using chocolate
Egg yolks & Corn starch to thicken a creme Anglaise
Creme Anglaise is a type of custard, regularly used ice creams, or just as a sauce by itself. The traditional base is a mix of cream and milk, with sugar for sweetness and possibly some ingredients for added flavors (e.g. spices such as cinnamon or cardamom). By gently heating this mixture with egg yolks or corn starch (or a mixture of the two), you will end up with a thicker, more viscous, mix.
Egg yolks are known to have a lot of thickening power. The proteins in the yolk unfold when they’re heated, holding onto more moisture and this way thickening the mix. Also, yolks contain a good amount of fat which helps create a luscious feel, and lecithin which helps the fat and water to mix well. When using egg yolks to thicken your custard you should be wary of not overcooking the custard, or you might end up with scrambled eggs!
Corn starch works in a slightly similar way, but instead of using protein to thicken, you’re really on the starch (a carbohydrate) to do the job. When starch is heated in water it will, just like proteins, hold onto more water by absorbing it into its structure. You don’t have to be as careful with heating when using corn starch, you can’t overheat it as well, but the final custard is slightly less luscious.
Gelatin to stabilize a cream
A creme Anglaise can still be quite runny and won’t hold onto its shape yet. For your cake though, you need layers that do not flow of the cake. It’s why you mix the creme Anglaise with some sturdy whipped cream. However, whipped cream will slowly collapse over time, the air bubbles will escape the mix and the whipped cream will return to its liquid shape.
A common way to help stabilize this is by adding gelatin. Gelatin is essentially is a mixture of proteins that happens to be very good in making stable gels. You’d use gelatin to make a panna cotta for instance. When you dissolve gelatin in water the protein molecules will form a complex network, holding onto the water. What makes gelatin very special is that this network is ‘reversible’. When you heat a gelatin gel, it will melt, but once it cools down again, it will set up firmly.
Getting the timing right
Gelatin takes a while to set. When you’ve just added the gelatin to your hot mixture you might feel like you’ve not added enough. However, once the gelatin has reached room temperature it will start to thicken. Just keep an eye on it. Once the overall layer is firm enough to not flow off the cake, you can start using it. Don’t wait too long, once the gelatin has set completely, this layer won’t be liquid enough anymore to coat a cake. If that happens, just (very gently!) reheat the layer (preferably before you add the whipped cream).
Replacing gelatin
Gelatin gives a very particular mouthfeel to a gel, it’s very smooth and melts well. You could replace it with agar agar, but the final texture will be slightly different. Also, keep in mind that agar agar needs to be treated slightly differently than gelatin to create that same gelling property.
Chocolate to stabilize chocolate mousse
The last stabilization act in this cake comes from chocolate. The last thick layer of the cake is a chocolate mousse, made from a ganache (chocolate + cream) mixed with a whipped cream. Whipped cream would, as we discussed above, normally sag out over time. However, the chocolate here helps keep everything in shape.
Chocolate is solid at room temperature, you can break and snap it. In order to make a mousse, you melt the chocolate, making it smooth and flowy and easy to mix in with your cream components. Once the mousse starts to cool down, the chocolate will start to set again. This hardness is just enough, to help the chocolate mousse hold on to its shape!
Getting the timing right
As is the case for the gelatin, getting the timing right on your chocolate mousse is important. If you mix you ganache with the whipped cream while it’s still hot, you will break down the whipped cream, collapsing the whole thing. On the other hand, if you wait too long, the chocolate will have set too much and it becomes too hard to mix and spread over your cake.
You can ‘fix’ this only before mixing the ganache with the whipped cream. If the ganache has set too hard, making it hard to stir through, reheat it gently (very gently you don’t want it to split) to warm it up just enough for it to be stirrable again.

Glossy layer on top
Last but not least, this cake is finished off with a beautiful glossy layer on top: a mirror glaze. We’ve written about mirror glazes quite extensively before, so will keep it short here.
Strictly said, a mirror glaze is again a smart way to thicken a liquid to create a beautiful topping. Again, you’re using gelatin for thickening. This layer is probably the hardest of all to right right, temperature and timing wise. The glaze will need to be liquid enough to pour over a cake, but thick enough to stick. Pour too soon and it will run off (see photo below), pour too late and it won’t pour anymore (luckily, you can reheat it!).
But what makes this layer special as well, is the glossiness of the mirror glaze. Again, gelatin plays a central role here. In fact, gelatin used to be used in photography to make glossy paper!


Torta Settevelli
Yield:
1 cake
Prep Time:
3 hours 30 minutes
Cook Time:
1 hour
Total Time:
4 hours 30 minutes
Torta settevelli, or, cake with 7 layers is a challenging project but will help you learn various techniques in one go.
The cake is made up of the following layers (from bottom to top): cake - hazelnut crunch - cream - cake - cream - chocolate mousse - mirror glaze. Prepare the layers in the order given below, the cream, mousse, and glaze should be made shortly before assembly. You can make the cake and hazelnut crunch in advance, up to one or two days.
The recipe we made is based on one from Food Lover's Odyssey.
Ingredients
Hazelnut paste
- 130g hazelnuts*
- 25g water
- 85g sugar
Hazelnut crunch (layer 2)
- 35g dark chocolate
- 15g butter
- 60g hazelnut paste
- 20g corn flakes (for some crunch!)
Cake (layer 1 & 4)**
- 115g all purpose flour
- 25g cocoa powder
- 1/8 tsp baking powder
- 1/8 tsp baking soda
- 3 eggs
- 150g sugar
Hazelnut cream (layer 3 & 5)
- 5g powdered gelatin + 15 ml cold water (or use an equivalent in sheets, 6g of leaves)
- 120g whole milk
- 120g whipping cream (high fat)
- 90g hazelnut paste (from previous recipe)
- 3 egg yolks
- 45g sugar
- 150g whipping cream (for whipping separately)
Chocolate mousse (layer 6)
- 75g whipping cream
- 100g dark chocolate
- 200g whipping cream (for whipping separately)
Mirror glaze (layer 7)
- 7g powdered gelatin + 15g water to pre-soak
- 85g water
- 80g cream
- 40g cocoa powder
- 120g sugar
Instructions
Hazelnut paste
You can make this a few days in advance. Just store it in an airtight container until you need it.
- Roast the hazelnuts in a preheated oven at 180C (=350F) for about 15 minutes. Check on them regularly (every 5 minutes) and remove them from the oven when they're a nice light brown and clearly smell like hazelnuts. Leave to cool.
- Add the water and sugar to a pan. Bring the water to a boil and ensure all the sugar has dissolved once it is boiling. Try to stir as little as possible once all the sugar has dissolved (read here how to fix a caramel). Leave to cook on a medium heat until it starts to caramelize. Once the sugar has turned a light brown, add in the hazelnuts and pour onto a heat resistant surface covered with parchment paper (caramelized sugar is very hot, about 160C (=325F)!
- Leave to cool down, the caramel will harden up.
- Once it has cooled down and turned solid, place in a food processor and grind down until you've got a rough paste.
Hazelnut crunch
You can make the crunch a day in advance. Store covered in the fridge until using.
- Melt the butter and chocolate in a microwave-proof bowl in the microwave by heating it on moderate for 20-30s at a second, stirring in between to prevent burning. Keep an eye on your microwave, every microwave has a slightly different power setting.
- Once the chocolate and butter are melted, mix in the other ingredients (hazelnut paste & corn flakes) and set aside until you need it for assembly.
Cake
You can make the cake a day in advance. Let it cool and then store in an air tight container until use. If you make the cake on the same day, keep in mind it needs to cool down completely before you can add the other layers of the cake.
- Mix the flour, cocoa, baking powder & soda together.
- Add the eggs and sugar to the bowl of a stand mixer with the whisk attached. Whisk the mixture until it becomes light and fluffy, it should foam up quite a bit. Whisk it until you're able to drop part of the mixture into itself without it sinking in immediately.
- Add half of the flour into the egg mixture and fold it in gently using a spatula. Once it is all mixed in, add the other half. You want to fold it in gently to ensure you don't lose a lot of air.
- Pour the batter into a 20cm round springform or cake tin. Bake immediately in a pre-heated oven at 190C (=375F) for about 15 minutes.
- Take the cake from the oven and leave to cool to room temperature.
Hazelnut cream
Make this within half an hour of when you actually need it. The gelatin will start setting as soon as it is done making it harder to spread out properly.
- Soak the gelatin powder in cold water and leave on the side until you need it.
- Add the milk, cream and hazelnut paste to a saucepan and heat until it almost boils. Take it off the heat. (You want to pre-heat the milk since you can do this quite rapidly, once the egg is in you have to be a lot more gentle to prevent cooking the egg.)
- Mix the sugar and yolks together in a bowl large enough to also hold the milk mix.
- While whisking, gently pour in about a third of the heated milk mixture. Whisk until completely mixed and then add the remainder of the milk mixture.
- Pour everything back into the saucepan and gently heat up to 82C (160F), while continuously whisking. You will notice that the mixture thickens up slightly, but it is hardly visible so using a thermometer will definitely help here!
- Take the mixture from the heat and add in the gelatin. It will dissolve quite easily now.
- Leave to cool until it's room temperature. Do not do the next step any sooner or your whipped cream will collapse since it can't handle heat well.
- Whip up the second portion of whipping cream and whip until you have firm peaks. That is, the whipped cream will hold its shape well.
- Add a third of the whipped cream to the milk mixture, fold in until you see no more lumps of whipping cream. Now add the rest in the same manner, one third at a time.
Chocolate mousse
Prepare this after the cream and just before you need it in assembly. You can start assembling the cake before you start the chocolate mousse.
- Break the chocolate in pieces and place in a microwave-proof bowl. Melt the chocolate in several sessions of 30-60s in the microwave at a medium power. It depends a lot on your microwave how fast this goes. Stir in between to prevent burning.
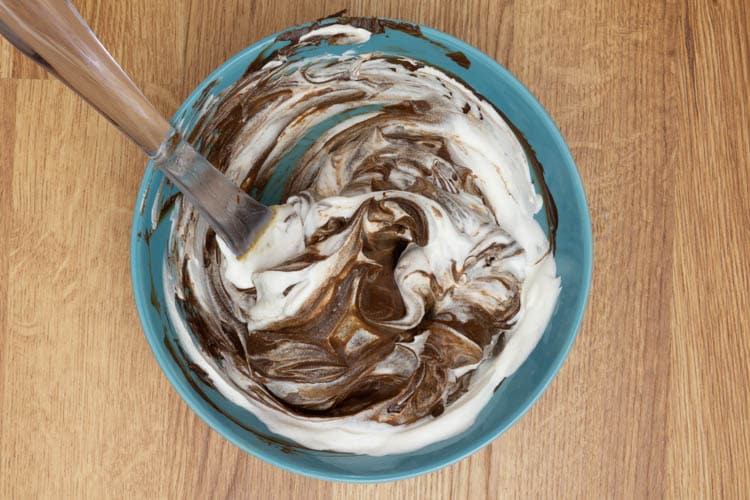
- Stir in the first portion of cream. If your cream is col you may want to re-heat it in your microwave, but only for a short amount of time. When mixing in the cream it may seem like it seizes, but don't worry, just continue stirring and it will all come together well. It will become a dark brown, thick and rich mixture.
- Leave to cool until it is at room temperature. It is now best to wait with the next steps until you are almost ready to use the mousse on the cake.
- Whip the second portion of cream until it creates stiff peaks.
- Fold in the whipped cream into the ganache in a similar way as you did for the cream. That is, mix it in in three different portions. This way you lose as little as air as possible.
- Once your mousse is ready it will start thickening, therefore, do not prepare this too soon.
Mirror glaze
Prepare this right at the moment that you need it. Do not prepare in advance since the gelatin will start setting and will make it impossible to use nicely. We have a more extensive guide here.
- Pre-soak the gelatin in the specified amount of water.
- Add all the other ingredients to a pan and bring to the boil. Once it is boiling, take it off the heat and add the pre-soaked gelatin. Stir until it is dissolved, which should go very rapidly.
- Leave the mirror glaze to cool. You want to pour it over the cake when it is in between 32-37C (90-100F). It should be liquid enough to pour, but viscous enough to not flow off completely again.
Cake assembly
Layer 1: Take your cooled down cake and cut it down horizontally so you end up with two thin cakes. If your top is very domed (we're using very little leavening agents to prevent just that) you might want to straighten it a little bit, but it doesn't have to be perfect. Take the bottom half of the cake.

Layer 2: Take the praline crunch and spread out over the cake layer. If it got too solid, give it a slight heat boost in the microwave and stir it through. Place the cake in the fridge to set.

Layer 3: Take half of the freshly made Bavarian cream and spread it in an even layer over the cake. Place it back in the fridge and leave it until it is slightly firm and strong enough to hold a next layer without collapsing. (Do not store the 2nd half of cream in the fridge, it will thicken too much.)

Layer 4: place the second layer of cake on top of the cake.

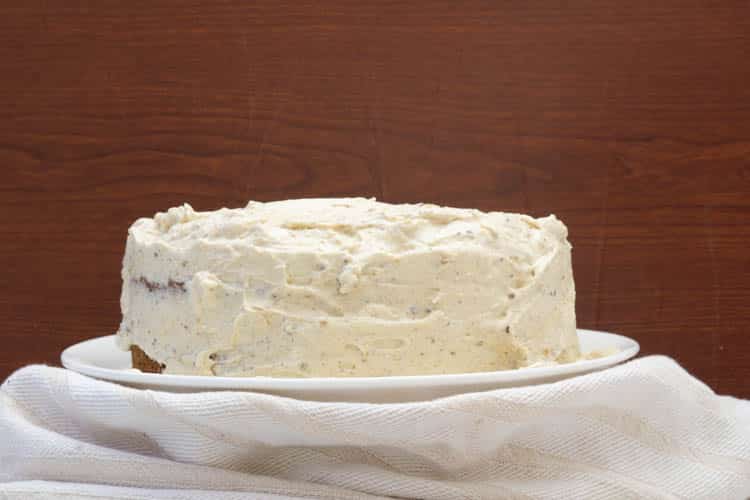
Layer 5: Spread the remainder of the cream on top, again, try to get the top as straight as possible and coat all the sides as well. Leave to firm up in the fridge. You want it cooled down properly after this step, that will help the chocolate mousse to set properly.
Layer 6: You now have to cover the whole cake in the chocolate mousse. Try to get the thickness of the sides and the top as evenly as possible. Also, make the whole cake as smooth as possible. The mirror glaze can't really hide any defects, so you will continue to see major defects through the glaze. Leave to set in the fridge and wait for the mousse to fully set.
Layer 7: Pour the mirror glaze over the cake. As described in the section on mirror glaze, you want to cool down the mirror glaze to approx. body temperature for the best results.
Notes
*We prefer using hazelnuts with their skin on, they brown a little more and add an extra layer of roasted flavor making a very flavorsome paste!
**If your cake has turned out a little dry, it might need some additional softening. You can do this by making a simple syrup of equal amounts of water and sugar (approx. 30g each). Heat it up enough for all the sugar to dissolve and then spread it over the cake. The syrup will moisten the cake and sweeten it slightly.
Sources
Kitchen detail, Juicy Post: Setteveli – The Ne Plus Ultra Of Sicilian Cakes, 2018, link
Unfortunately I do not read Italian, that would have been the best way to learn about. But I did my best (thanks Google Translate). Despite not being able to read everything these website did shine a good light on the cake and its name:
A very similar looking cake (but different name) is sold at other patisseries, link
Torta Setteveli, website of the original cake
La farfalla di cioccolato, Torta, Settestrati, 2010, link
Dolcemente salato, torta setteveli, anzi settestrati, 2012, link
What's your challenge?
Struggling with your food product or production process? Not sure where to start and what to do? Or are you struggling to find and maintain the right expertise and knowledge in your food business?
That's where I might be able to help. Fill out a quick form to request a 30 minute discovery call so we can discuss your challenges. By the end, you'll know if, and how I might be able to help.


