Learn the science behind:

The Science of Tempering Chocolate + An Easy Way to Temper
If you’ve ever watched a tv baking show, chances are, you’ve seen participants trying to temper chocolate at some point. Often, this is a recipe for some drama (which is of course why it’s part of a tv show…). Chocolate tempering can be finicky and some contestants are bound to miss the mark.
However, untempered, chocolate just doesn’t look as good. It won’t be glossy, nor snappy. So, for high-quality chocolate products tempering is unavoidable.
Even though tempering may seem an art, there’s a lot of science behind it. It’s all about controlling the crystallization of fat crystals. There’s just one specific crystal type you’re aiming for. To get it, you either need some proper temperature control, or know about a smart short cut!
Why you need to temper chocolate
Attractive chocolate has a glossy, shiny surface. And when you break it, it doesn’t bend, instead, it snaps. Both of these crucial properties depend on chocolate being tempered well.
Untempered chocolates are matte, soft and lack the snap when you bite into them. You can’t make delicate chocolate art with untempered chocolate, it won’t be able to stand up. It’s also far more likely to show fingerprints when touched. Over time, untempered chocolate is also more prone to a phenomenon called bloom. Bloomed chocolate has white spots and marks on its surface, making it look less appealing.
Tempered chocolate is easier to handle – it shrinks
But it’s not just a matter of pleasing chocolate consumers. Tempering chocolate is also crucial for chocolatiers and manufacturers. Many chocolates are made using molds. Warm liquid chocolate is poured into these molds and then set until solid. A well tempered chocolate can be removed from molds quite easily. And that’s because tempered chocolate shrinks when it cools down and sets. By shrinking, it ever so slightly pulls away from the mold’s surface. Untemperd chocolate does not shrink. As such, it can be almost impossible to remove set untempered chocolate from molds. Sometimes, the conly way to do so is to reheat the chocolate, and that would defeat the entire purpose!
Shrinking chocolate isn’t just convenient for molded chocolates. By contracting, the solid chocolate can be removed more easily from many surfaces such as belts, or plastic coatings. It makes the process a lot cleaner.
Tempered chocolate sets faster
Another major advantage of tempered chocolate is that it sets considerably faster than untempered chocolate. Setting may only take half as long. This of course speeds up any production process with chocolate, you don’t have to wait for it to set as long.
What is tempered chocolate?
Despite the stark differences in behavior, tempered chocolate and untempered chocolate are identical from a compositional point of view. They contain the exact same ingredients and molecules. As such, they can easily be transformed from one into the other. You can temper untempered chocolate and simply untemper tempered chocolate. The chocolate remains the same. Theoretically, you could do so for many times without impacting the chocolate.
So what sets apart tempered chocolate from untempered chocolate is not what it is made of. Instead, it is all about how the molecules within a chocolate are organized. More specifically, how the fat molecules have organized themselves. In tempered chocolate these are closely arranged in a very specific 3D structure. In untempered chocolate, this degree of organization is not present, instead, it is slightly more loose.
Chocolate is about 1/3 fat
It is very common for about a third of a chocolate’s weight to consist of fat. The remainder is made up of mostly sugar and cocoa mass or cocoa powder, and possible some milk ingredients, depending o nthe chocolate type. The cocoa mass is what makes chocolate brown and comes from a cocoa pod.
Cocoa butter is a cocoa pod’s fat
In many countries, in order for chocolate to be called chocolate, almost all of the fat should be made up of cocoa butter. Cocoa butter is the fat that’s naturally present in a cocoa pod, the starting point for any chocolate. It’s a special fat. It is responsible for that melt-in-the-mouth behavior of chocolate. It’s also the reason you need to temper chocolate.
What’s the difference between white, milk and dark chocolate? White chocolate does contain cocoa fat, but no cocoa powder. Milk chocolate also contains dairy milk ingredients and dark chocolate does contain cocoa powder, but no milk.
A unique mix of triglycerides
Cocoa butter, like other fats and oils, is made up of a mix of triglycerides. Triglyceride molecules consist of a glycerol backbone attached to three – hence tri – fatty acids. The types of fatty acids present determine the behavior of the triglycerides. Not all cocoa butters have the exact same triglyceride composition, but, they do have a lot in common. They will all contain roughly the same type and same amount of fatty acids within their triglycerides.
Fats determine melt-in-the-mouth behavior
An important characteristic of a mix of triglycerides, thus a fat, is the temperature at which they melt when heated, and set when cooled. Oils for instance are liquid at room temperature, whereas lard, butter, and chocolate are (mostly) solid at room temperature. Again, this is determined by the type of fatty acids present in these fats.
The composition of cocoa butter fats is such that the melting point of the fats happens to be around 37°C (98°F) which is your body temperature! It’s why chocolate literally melts in your mouth. If it would have been just a few degrees higher, it might have felt waxy in your mouth. Just a few degrees lower and it would melt in your hands way more easily.
Aiming for β or V fat crystals
To complicate matters, the fat in cocoa butter doesn’t have one specific temperature at which it sets when cooled down from a liquid. Instead, it can set at various temperatures. The temperature at which it sets determines how the fat molecules organize themselves. Or, more accurately, what type of crystal it forms. As such, it determines whether chocolate is tempered or not. For chocolate to be tempered its fat crystals need to arrange themselves in the so-called β or V (the Roman number five) crystal type.
Create the right crystals as starting point
For all of the chocolate fats to set in the right type of crystal, you need to form enough of these crystals to start with. These will be the starting point for future crystals to grow on. A well tempered chocolate contains just enough of these desirable fat crystals to ensure all other fats will set in the right way as well.
It’s why a tempered chocolate may still be liquid. Not all of the fats have yet formed crystals, instead, just enough crystals have formed that once you continue cooling, the rest of the fats form that type of crystal as well.
Tempering creates the right crystals
To ensure you get the right type of crystal you need to temper chocolate. Tempered chocolate is still liquid chocolate. It can still flow. Only when you cool tempered chocolate down completely will it turn solid. Tempered chocolate contains just enough solid fat crystals.
Any tempering strategy always starts by getting rid of any fat crystals. You do this by simply heating up chocolat to at least 45°C (113°F). At this temperature, no solid fat crystals will be left. This way, you can be sure that there are no ‘wrong’ crystals left.
Once molten, you can use two major strategies to temper chocolate.
Strategy 1: Controlling temperature to form crystals
Every fat crystal type in chocolate has its own melting point. Some crystals shapes start to form at lower or higher temperatures than others. It so happens that the crystal type we’re aiming for, that β or V crystal, has the highest melting point of them all*. That means that at this temperature, none of the other crystal types can form just yet, except for this one. All others need a cooler environment to form. If you keep chocolate at this melting temperature only those crystals form and the chocolate will temper. However, it takes quite long at this temperature for the crystals to form.
Cool down and heat up
This is why most tempering strategies cool down the chocolate slightly more. That will result in the formation of some undesirable crystals, however, those will be melted off again later. It does ensure that the crystals are formed reasonably fast.
Temperature depends on chocolate type
The temperature at which these crystals are formed is around 30°C (86°F). That said, the exact temperature does depend on the type of chocolate. For commercial chocolates, this temperature may be given by the manufacturer. For consumer products it’s generally not given.
Precision is key
This method relies on precision. If the chocolate is a few degrees too cold, the undesirable crystals may form. If it’s too warm, no crystals may form at all! There are different way to control the temperature, depending on the exact tempering method. Large scale equipment has tight temperature controls. If you temper chocolate by hand it might involve a lot of stirring while cooling down. Or, the method may tell you to mix warmer and colder chocolate together to help achieve the right tmperatures more quickly.
Why a marble slab?
you may have noticed that experts temper chocolate on marble slabs. This is because these slabs are quite cold. They serve as a good heat sink to cool the chocolate down quite quickly. To temper the chocolate, it is important to continuously move the chocolate around. Otherwise the chocolate at the bottom would set, while the top is still liquid.
Strategy 2: Seeding, adding crystals
The second way to temper chocolate is by simply adding the right type of fat crystals to the fully molten chocolate. Often, this would mean you add previously tempered chocolate to newly molten chocolate. Especially at a smallscale, this is the easiest method. It still requires temperature control, but not as tightly as when using method 1.
At the bottom of this article you can find instructions for how to use this method to temper chocolat at home.

Measuring temper
At home, you can only see whether the chocolate was tempered properly, by juding the final set product. If it’s shiny and snappy, it’s tempered, if it is dull and didn’t shrink, it is not. Factories of course, can’t rely on his. They can’t wait until the end of the process to determine whether the temper is good. It is why factories have tempermeters where they can measure whether the temper of a chocolate is good. Experienced pastry chefs can ‘feel’ whether their chocolate has been properly tempered, they don’t even need a machine!
Under- & overtempering
It is possible to both over- and undertemper chocolate. Undertempered chocoalte does not contain enough of the desirable fat crystals. As a result, it does not set fast enough and it very prone to bloom (the white marks on a chocolate). Overtempered chocolate on the other hand contains too many fat crystals. It becomes too thick and viscous to handle and won’t be as glossy.

Easy Way to Temper Chocolate at Home
This method of tempering uses the 'seeding method'. That is, we're adding fat crystals that have already set in the correct crystal type. This way, we're encouraging the other fats to crystallize in a similar manner.
This method is generally regarded as a simpler method, but it does require you to have already tempered chocolate at hand. Any chocolate tablet/bar in stores will be tempered, so those are good candidates. If buying in bulk, be sure to double-check.
Ingredients
- Tempered chocolate of your liking
Instructions
- Break the chocolate into smaller pieces.
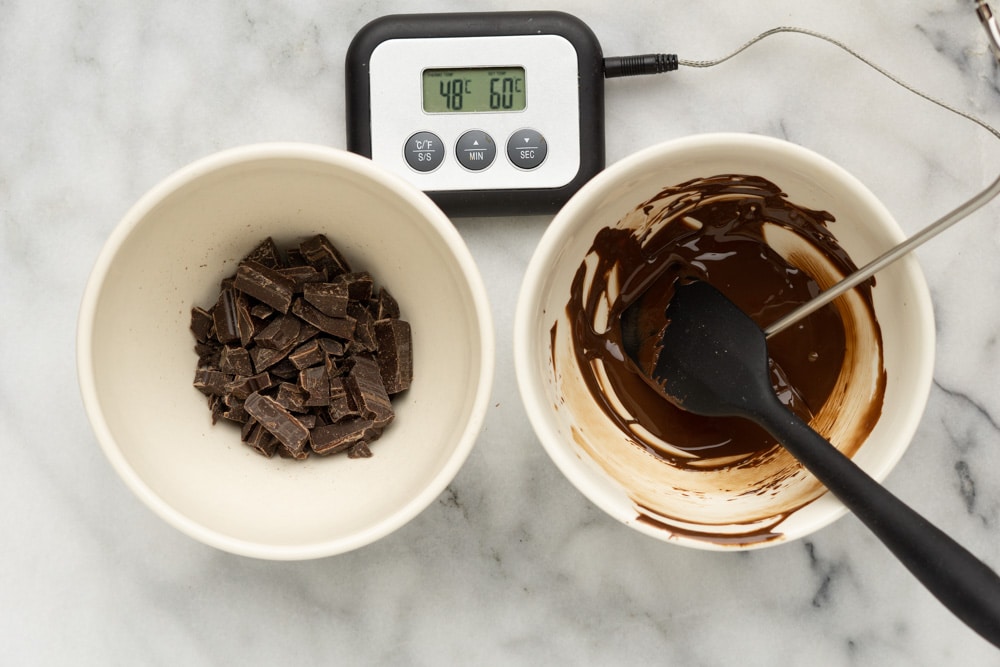
- Using a microwave or au-bain-marie, melt about two thirds of the chocolate. If you have a thermometer, it should have become at least 45°C (113°F) to ensure all crystals have melted down completely. If you accidentally overheated the chocolate, just wait a little while for it to cool back down slightly.
- While melting the chocolate, chop the remainder of the chocolate into small pieces. This will help it melt evenly.
- Start adding the finely chopped chocolate to the fully melted chocolate. This chocolate will start to cool down the melted chocolate. Initially, the chocolate melts quickly. However, you'll notice that every next portion will take a little longer.
- Be sure you add the larger pieces first and only add finely chopped chocolate towards the end.
- Continue adding until the temperature is 30°C (86°F). Wait with adding each next portion until the previous one has fully molten! After adding the last portion, you should notice that the chocolate has thickened slightly. It is possible that you haven't added all the chopped chocolate. Do not continue adding at this point though, it can ruin the temper again.
- Your chocolate is now tempered and ready to use.
References
Hartel, R.W., vol Elbe, J.H., Hofberger, R. Confectionery Science and Technology, 2017, chapter 15.5
*This is not completely true. There is another crystal type, however, that one forms very slowly and isn’t as much of an issuewhen tempering chocolate.
What's your challenge?
Struggling with your food product or production process? Not sure where to start and what to do? Or are you struggling to find and maintain the right expertise and knowledge in your food business?
That's where I might be able to help. Fill out a quick form to request a 30 minute discovery call so we can discuss your challenges. By the end, you'll know if, and how I might be able to help.


[…] texture in chocolate.Tempered chocolate has a shiny surface and snaps when broken, indicating the formation of the desired crystal structure. In contrast, untempered chocolate can appear matte, be soft, and lack a satisfying […]