Learn the science behind:
The Science of Honeycomb Candy (+ Troubleshooting Tips)
Honeycomb definitely is one of the more theatrical candies to make. Once you add that baking soda to the boiling hot sugar, the fizzing and puffing are sure to impress your viewers. Once the show is over and your honeycomb has cooled down, you’re left with a light and airy, super crunchy candy.
It’s pure chemistry at work and a surprisingly interesting balancing act, considering you need only 3 ingredients and two process steps to make it. Get your sugar types and ratios wrong and the honeycomb collapses or turns sticky. Use too much or too little baking soda and the light and airy puff collapses on you or doesn’t even materialize.
Luckily, we’ve got chemistry and science to help us out here and problem solve the art of making honeycomb.
What is honeycomb candy?
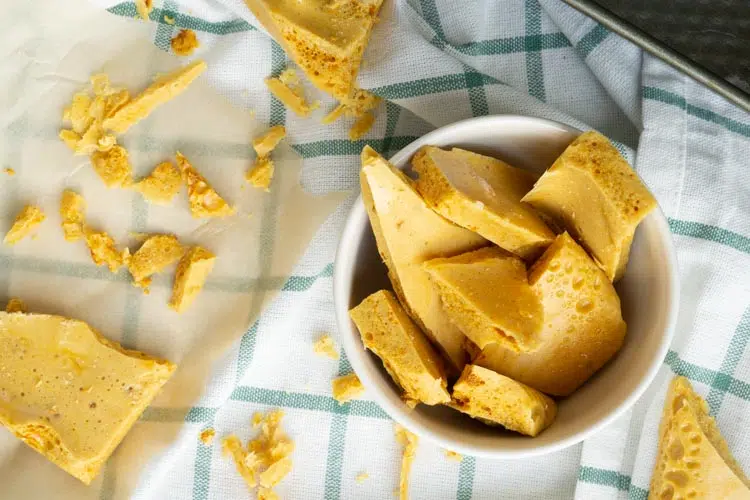
Honeycomb candy (also called cinder toffee, seafoam, sponge toffee, or one of many other variations) is a simple, sugar-based, airy, and very crunchy candy. It is closely related to toffees or brittles. The main difference though is that it contains a lot of smaller and larger air bubbles. Without these bubbles, the honeycomb would be very hard and tough to eat. These bubbles are also what give the honeycomb its name! It kind of looks like a ‘real’ honeycomb.
Making honeycomb requires only three ingredients: sugar, sugar syrup (e.g. corn syrup) and baking soda (more on those later). You bring the sugars to the boil and once you reach the desired temperature (which is well above the boiling point of water!) you add baking soda. This baking soda fizzes and expands the sugary liquid into an airy mass. Simply leave it to cool and it will set into a hard, crunchy but light texture.
Honeycomb doesn’t get its name from the fact that it’s made with honey (even though you can make it with honey). Instead, the light and airy shape will remind you of a ‘real’ honeycomb!
What happens when you make honeycomb?
Making honeycomb truly is a great science experiment. During each of the phases of making honeycomb, cooking, expanding & cooling, a core scientific process is taking place. So let’s have a look at each of these.
Step 1: Cooking Sugars
Making honeycomb starts out by cooking a mix of sugars (more on those later) to a very high temperature. This sugar solution is made out of a mix of different sugars such as sucrose, glucose, fructose as well as other larger carbohydrates and water.

Concentrating Sugars
When you start boiling the sugars in water you are dissolving all those sugars in the water. The white sugar crystals will disappear as they dissolve in water. Once all the sugar is dissolved and you continue heating the solution, you’ll be boiling off water. You’re concentrating the sugar by evaporating water from the sugar solution.
Pure water boils at 100°C (212°F, assuming you’re at sea level). Because of a phenomenon called ‘boiling-point elevation’, this boiling point increases with an increasing concentration of sugar. By evaporating water, you’re increasing the sugar concentration and thus increasing the boiling point. It is why the temperature of your sugar solution goes up and up when you continue to boil it.
Similar to the “boiling-point elevation” adding sugar to water can also decrease the freezing point, this is called “freezing point depression” and is used to make smooth and soft ice cream!
The temperature of the sugar solution and the concentration of sugar in that solution are very closely correlated. As such, once a sugar solution has reached a certain temperature, you will know it will have achieved a set concentration (it’s why you need a thermometer). Just how high the concentration of sugar is in your sugar solution will impact how that sugar behaves once it’s cooled down again! We discuss this in far greater detail in a post focused on those ‘sugar cooking stages‘.
Aiming for a glassy structure
If you concentrate that sugar solution enough there is so much sugar in the water, that once you cool it down again, those sugar molecules cannot move around freely anymore. Instead, they will form a ‘glass’. This is a hard, brittle, but smooth, texture. The candy called ‘brittle’ is such as glass, as is toffee. It is also what you’re after when making honeycomb. You want the sugar to be so concentrated that upon cooling it forms a stable glassy structure.
This is why instructions for making honeycomb will often mention a temperature to which you have to cook the mixture. This temperature ensures that you’ve reached a high enough concentration of sugar for the honeycomb to be brittle!
Fixing an incorrect temperature
Too High
If you’ve overshot the temperature, add a little extra water and hold off on adding the baking soda. The additional water cools down the solution and decreases the sugar concentration. Just continue boiling again and this time stop at the correct temperature.
Note: If you’ve overshot the temperature by a lot your sugars might have started to brown and caramelize. You can still use the fix, but, your honeycomb might turn out browner and more bitter.
You can’t use this fix forever. The prolonged heating will break down some of the sugars, changing the composition of the sugar solution. If you have to ‘fix’ your solution too often (more than 2-3 times) you can run a risk of the honeycomb becoming a little more sticky than you were hoping for.
Too Low
If you haven’t cooked your syrup to a high enough temperature, simply continue cooking!
However, once you’ve added your baking soda there’s no way back. What you will find though is that your honeycomb won’t be brittle and hard. Instead, it might turn out soft and maleable once it has cooled down. You haven’t evaporated enough moisture.
No significant browning just yet
Sugar will caramelize when it’s heated to high enough temperatures. During this process, the sugar turns brown and a lot of caramely flavors get formed. When cooking your syrup you might see the sugar solution starting to turn a light brown, however, it will tend to stay quite pale in color. This is ok. More color will be formed in the next step.
If you’re using a sugar syrup that has some color already (e.g. golden syrup, dark corn syrup) your sugars will have a color at this point!
Step 2: Expansion

Once you’ve cooked that sugar long enough to evaporate all necessary moisture, it’s time to expand that toffee and create the honeycomb structure! This is done by adding baking soda. Baking soda is a commonly used leavening agent in cakes, pancakes, and many more products. It works the same in those products as it does in honeycomb.
The chemical name for baking soda is sodium bicarbonate (NaHCO3). When sodium bicarbonate reacts with an acid it will react to form carbon dioxide, which is a gas. This gas is formed all throughout the honeycomb and expands the sugar solution, creating a lot of air bubbles! The higher the temperature, the faster this reaction happens. Since the sugar solution for a honeycomb is pretty hot, it all happens very quickly.
For the chemists: the reaction that takes place when baking soda reacts is: HCO3– + H+
From: our post on baking powder & baking soda↔H2CO3 –> H2O + CO2. The acid (H+) comes from the corn syrup and sugar themselves which are naturally slightly acidic. Since the temperatures are so high, only a little acid is required for the reaction to happen rapidly.
Some caramelization happens as well
Caramelization of sugar is a complex series of a lot of chemical reactions all taking place at the same. Caramelization happens when pure sugar is heated up to very high temperatures (above the 150°C that you use for honeycomb). However, it is sped up when the pH is acidic or alkaline. By adding baking soda (which is alkaline) to the sugar solution you help accelerate these reactions. As a result, your honeycomb can turn a lot browner.
Color turns yellow/whitish
At the same time, your honeycomb might also turn a light yellow during expansion. In the gif above you could see that transformation. This is caused by the incorporation of air bubbles. Air bubbles reflect the light differently than a solid mass of sugar would. As a result, the honeycomb turns a lighter color!
Adding too much or too little baking soda
Getting the quantity of baking soda right is important to get the right number and size of air bubbles. If you don’t add enough baking soda the honeycomb will remain quite dense, with only small air bubbles.
You can also add too much baking soda though! If you add too much so many air bubbles are formed that a lot of them will escape from the honeycomb before it has time to set. Also, you run the risk of not all the baking soda reacting and leaving behind a very metallic aftertaste.
Step 3: Glass formation
The last seemingly simple, but crucial, step is cooling down the honeycomb. While the honeycomb cools that glass like structure has to be formed. The liquid sugar syrup turns into a glass. This happens by itself but should happen reasonably fast to ensure that all those carefully created gas bubbles don’t get a chance to escape and get captured permanently. As such, you can’t make a huge tank full of honeycomb. It will take too long for the center to cool down, causing the gas to escape.
Only during cooling will you be able to see if you prepared the sugar syrup properly. Does the honeycomb not turn solid but remain soft? Chances are you’ve not cooked it for long enough or used the wrong type of sugars (more on that later).
Mould to pour it into
The honeycomb will be very bubbly and depending on what type of honeycomb you’re looking for you can change your mold type. Deeper ramekins or cake tins for instance help create a thick honeycomb whereas spreading it out on a tray makes a thinner honeycomb. It’s easier for gas to escape from the thinner honeycomb so it might be a little less airy. Experiment with the best format for your purpose.

Which sugars should you use to make honeycomb?
For honeycomb to form that glass structure you need a good amount of sucrose to be present. Sucrose can form that glass and provide hardness. As such, most honeycomb recipes will contain a good amount of ‘regular’ sugar (e.g. granulated sugar) which is pure sucrose.
Can’t be just sucrose!
However, you can’t make honeycomb with just sucrose (as we tried below)! Sucrose is very prone to crystallization when you’ve concentrated it as much as you do for making honeycomb. As such, you need to add something to prevent the sugar from crystallizing. If you don’t, the sucrose will simply start to crystallize once you start stirring in the baking soda. It won’t be able to hold onto the air and become a crumbly white mess.

To help prevent the sucrose from crystallizing, you can add a sugar syrup. That sugar syrup will contain other sugars aside from sucrose which help to prevent it from crystallizing. There are a lot of options here that can work, each will make a honeycomb with a slightly different flavor profile.
Glucose syrup / Corn syrup
Glucose syrup (called corn syrup in the US) is made from starches that have been broken down partially. As such, it contains small sugars like glucose and fructose, as well as longer chains of sugars. This mix of carbohydrates has a few advantages. The main one being that those long chains prevent the crystallization of sucrose.
Glucose syrup itself is bland in flavor and is slightly less sweet than sucrose, making for a moderate sweet honeycomb.
You can even make honeycomb with just corn syrup, not using any ‘regular’ sugar!
Specialty sugar syrups
In the Netherlands you can find a special sugar syrup called schenkstroop (which translates as ‘pouring syrup’). This syrup is dark in color and has a strong flavor, it is not pure molasses though.
You can make replace the corn syrup with this syrup and still make a honeycomb. The flavor of the honeycomb is a lot stronger though, even a little bitter. Also, it doesn’t turn out as light as airy. It was a little denser.
Since this syrup works well we have no doubt specialty sugar syrups unique to other regions (e.g. kandijsiroop from Belgium) will work as well.
Honey
Despite the name being ‘honeycomb’, most recipes don’t actually use honey. That said, you can make honeycomb with honey. This again has a big impact on the flavor. The honey flavor will come through.
Also, honey is a bit more prone to burning than other sugars. Honey contains a lot of fructose. Fructose is know to start to turn brown and burn at far lower temperatures than sucrose as well as glucose. As such, you might need to experiment a little and possibly reign in the honey content slightly.
Keep in mind that unlike ‘regular’ sugar (sucrose) and corn syrup, the composition of honey is way more variable. This is especially true for smaller batches. Honey is made by bees from what they find around them. Depending on their surroundings, the composition of the honey may vary. As such, the final honeycomb may turn out differently as well!
Golden Syrup
Especially popular in the UK, golden syrup can also be used in honeycomb. Golden syrup is inverted sugar, that is, sucrose that has been broken down into equal quantities of glucose and fructose. As such, golden syrup only contains glucose and fructose and none of those longer molecules. This does make honeycomb made with golden syrup a bit more prone to stickiness. You might notice that recipes using golden syrup use a bit less liquid syrup compared to a recipe using glucose syrup.
How to store honeycomb
Honeycomb is crispy, and crunchy thanks to you boiling that sugar syrup to just the right temperature. This crunch is what makes a honeycomb fun and good to eat. Once it loses this crunch it becomes tough and rubbery and the ‘magic’ is gone, it might even start to lose some of those air bubbles.
Keeping honeycomb crunchy requires very much the same science as cooking the sugar syrup does: keep out the moisture. Additional moisture is detrimental. As such, you should always store honeycomb in an air tight container to protect it from humidity in the air.
Humid climates
Making honeycomb in a very humid climate is very tricky. All that moisture in the air would love to sit in and on the honeycomb you just created. Before that honeycomb has even had the time to cool down and harden it might have absorbed moisture. Your best bet: make it on not-so-humid days or in a climate-controlled space.


Why most honeycomb sold in supermarkets is coated in chocolate
Since honeycomb is so sensitive to moisture it’s hard to buy it ‘naked’ in most stores. Specialty candy stores might sell freshly made honeycomb since they will have sold it before it has time to get soggy. However, supermarkets and other larger outlets typically don’t sell it, it simply isn’t stable for long enough.
What you will find more commonly instead: honeycomb coated in chocolate. The chocolate takes over the role of moisture barrier. Moisture can’t travel well through chocolate and as such the chocolate coating protects the inner honeycomb from turning tough!

Honeycomb
Yield:
8-10 portions
Prep Time:
5 minutes
Cook Time:
30 minutes
Total Time:
35 minutes
Making honeycomb isn't as complicated as you might think, but a fun chemical balancing act!
Ingredients
- 100g sugar
- 45g corn syrup (or any of the other syrups mentioned about)
- 25g water (exact quantity not important, adding more will only increase the cooking time)
- 1/2 tsp baking soda
Instructions
- Prepare a heat resistant tray/cake tin and cover with parchment paper.
- Mix the sugar and corn syrup in a pan and add the water.
- Bring the mixture to a boil and ensure that all the sugar crystals have dissolved. If they haven't, give the pan a very gentle swirl to help them along.
- Continue cooking the sugars until they are 150°C (300°F). The sugars will have started to brown but only slightly, this is ok, adding the baking soda will help it turn brown rather quickly.
- Take the mixture off the heat and mix in all the baking soda. Do this fast. Watch out, the sugar syrup is very hot and the baking soda will cause it to bubble up a lot!
- Immediately pour onto the heat-resistant surface and leave to cool.
- Once it's cooled down, break into shards. Either eat immediately or store in an air-tight container. The open sugary structure attracts moisture easily (it's very hygroscopic). Keeping it away from air will ensure you can keep it for a few weeks.
References
Andy Connelly, The science and magic of cinder toffee, The Guardian, 24-Sep, 2010, link
Nor Shuhada Binti Shoberi, The role of pH, temperature and catalyst type in caramel manufacturing process, 2010, link
Wikipedia, Honey, link, visited 12-May 2021
What's your challenge?
Struggling with your food product or production process? Not sure where to start and what to do? Or are you struggling to find and maintain the right expertise and knowledge in your food business?
That's where I might be able to help. Fill out a quick form to request a 30 minute discovery call so we can discuss your challenges. By the end, you'll know if, and how I might be able to help.


My problem is getting to the correct temperature of 300° F without it burning. It takes a very long time at 5000 ft here in NV. How can I reach 300°F without burning my mixture? Please advise. Thank you. M
Hi Maureen,
I don’t have experience cooking syrups like these at elevation, but do know that you will need to correct your temperatures for the elevation. Since you’re up higher, the boiling point of water (and thus your sugar solutions) will be lower than at sea level. I’d recommend correcting the required temperature by the same amount that your boiling point differs from that at sea level.
As an example: if you’re at 3000m (approx 10000ft) above sea level, you’re boiling point of regular water is around 90C (193F). At sea level the boiling point is 100C (212F). I would recommend cooking your sugar syrup to 300 – (212 – 193) = 281F. That should work for most candy types recipes. You might have to tweak it a little to get it perfect but it should get you a lot closer than what you’re doing now!
Hope that works better for you 🙂
I’d like to coat my honey comb with chocolate. Do you have instructions for that?
Hi Ellen,
The most important thing when coating honeycomb with chocolate is to ensure it’s fully coated. Any holes will let in moisture. If you coat it well, it will stay crunchy a lot longer than uncoated.
If you don’t plan on storing it for long (and not selling it for instance), all you’d have to do is melt your chocolate and dip the honeycomb in it. Depending on the sizes of the holes of your honeycomb you might need to dip it again (smaller sizes are easier to fully coat).
If you want to take it one step further you’d first have to temper the chocolate. You can do this by either mixing in some tempered chocolate (chocolate bars sold in stores are all tempered) through cool molten chocolate, or by fully tempering your chocolate. Then just dip the honeycomb in that.
Hope that gives you a good start!
Thank you so much for your help. I have ruined many batches of honeycomb candy trying to get to 300°F here and ending up with a burnt taste or worse. I had been trying to correct the problem by adjusting ingredient amounts to no avail. I will retest per your suggestion. Many thanks for responding to my situation. Be well! Maureen
Hi I’ve been trying to make the honeycomb dalgona from squid games but as the thin disks are cooling they crack …. What am I doing wrong
Hi Sophie,
I haven’t tried making this specific treat (yet), but have a few thoughts as to what you could try to ‘fix’ it:
Hope that helps!
Hi there, I’m an aspiring candy maker, and have only made honeycomb a couple times so far. The biggest problem I’m running into is after my candy cools, it falls quite a bit. How to I keep it aerated nicely? I have a few humidifiers in the home that I run constantly during winter. Is it advisable after pouring the candy in the pan to put it in the fridge/freezer where it’s drier? Thanks!
Hi Aaron,
Thanks for your question! It’s a tricky one :-).
Does the honeycomb collapse immediately after you’ve made it? If so, you could also consider adding a little less baking soda. If honeycomb expands too much, it can’t hold onto all those air bubbles anymore, and it collapses. Adding a little less baking soda creates fewer air bubbles and might prevent the collapse. It sounds counter-intuitive, but I’ve found it to work well in the past!
Secondly, if you’re concerned that your environment is too moist, you could consider cooking the sugar just a few degrees hotter. This will eliminate even more moisture and make it even drier.
Also, you’re absolutely right about the importance of humidity! If it’s too humid, the honeycomb will turn sticky and collapse. However, placing it in the fridge won’t help, fridges tend to be quite moist actually. Since you’re running humidifiers, I’m assuming it’s quite dry outside? Could it be worthwhile placing it outside (of course, this depends on your climate) to cool down?
Once it’s at room temperature, be sure to pack it air-tight, this will prevent it from absorbing extra moisture!
Hope that helps!
Must be a secret trick to this candy.
It is not airy and light….. By all recipes I’ve tried
That’s a shame Karen! Could you share a recipe you’ve tried so we can see if we can troubleshoot it together? The main ‘tricks’ are cooking it to the right temperature and adding in the baking soda.
Also, did you store it airtight after making it? Not doing so can make it sticky and hard and unappetizing in a few days (or several hours, depending on your climate).
So i’ve made honeycomb about 8 times over the past few weeks, and the problem i run into, is that the syrup burns before reaching 150c. I use clear honey, and if I add the baking soda earlier than 150c, it is less burned, but doesn’t end up as brittle, and stays somewhat chewy and dark in the middle. It usually starts burning around ~140c
Hi Tim,
That’s a shame! I think the culprit here is the honey. Honey contains a lot of glucose and fructose (types of sugar). The fructose especially is prone to burning at lower temperatures. It’s why our standard recipe uses corn syrup, it’s less prone to doing so. I would recommend lowering the honey content, possibly replacing some of it with corn syrup. You could also try using a different honey (there’s a lot of variation between honeys).
Hope that helps, if not, let me know.
We keep our honeycomb in an airtight container in the freezer. I also use honey in my recipe but it’s a smaller ratio to the other sugars.
Good write up.
Chef – thank you for all this insight! Love the science of it……
Technical question – have had good results using multiples of the recipe – but once the soda is added – removing the candy from the pan with a spatula tends to squish out air bubbles and make a small portion of the candy very dense. I am adding the soda at about the 300 degree mark. Any science to removing from the heat and allowing it to cool slightly before adding the soda to hopefully maintain the air bubbles. I think the solid-ness of the finished product is achieved by reaching the 300 degree temp – but not sure how it would respond to cooling slightly prior to adding the soda. Thank you for any further guidance!
Hi BigRed1,
Great question! Making honeycomb is a delicate balance, so whereas I’m sure you can add the baking soda a little later (though not too late) you might need to do a little testing to get it just right. Few thoughts on my end:
Hope that helps and let me know what you find!
Chef – I have been making this regularly in a 10x batch – what has worked best for me is: induction burner is the way to go – as well as HEAVY BOTTOM pot to hold & maintain heat. Since induction burner heats to set temp – as long as the temp on the burner is correct – it will heat to and hold at 290-ish – then I can babysit the last few degrees without going over. The soda needs whisked in vigorously to avoid beating out the air bubbles as they form. Mix in soda while still on the burner at slightly lower temp and the candy will double in size – it then gets QUICKLY! transferred to 2 hotel pans (lined with parchment) that are raised off the table with kitchen towels. This helps to avoid dissipating the heat to quickly if the pans rest directly on the stainless table. Use a silicone spatula (candy will stick) and hot pad – as the pan is approx. 300 degrees! Don’t try to “WORK” the candy once dumped – it smashes the air bubbles out. You don’t really get all the candy from the pan before it hardens – but clean up is not to bad. Quite a fun learning experience!
Hi BigRed,
Thank you for sharing your tips and tricks! It sounds like you have figured out a great process that works consistently. I should probably consider getting one of those induction stove tops that you can set at a temp, sounds like they make your life easier :-)!
What about a splash of vinegar to creat small bubbles? What would be the chemical reaction to the sugars?
Hi Robert,
Adding vinegar to hot sugar without adding baking soda won’t do much in the way of creating bubbles. If you add vinegar to sugar during or before cooking it can result in the formation of invert sugar. This is essentially sugar broken down into glucose and fructose. That’s not necessarily something you want to happen too much of though when making honeycomb. It can make the final honeycomb sticky.
Hope that helps!
Hello,
I was wondering if you would be able to contact me? Fairly new to the candy making business and have a question about the sponge candy. I would appreciate it if you could find the time to chat 🙂
Hi Stacy,
Definitely happy to talk. We can have an online call (find a time that works for your here: https://calendly.com/foodcrumbles/course-feedback?month=2022-10) or feel free to send me a message with your question/challenge here.
Looking forward to hear from you!
Hello!
I tried a recipe similar to this except it uses gelatin to make the bubbles more dense (I think it’s called seafoam where I’m from). The first two attempts I tried using golden syrup and it came out super sticky and the texture was off. At first I thought it was the humidity but the second time I tried it on a day that wasn’t humid at all. After finding this article (and a successful attempt using corn syrup instead) I discovered that the problem was in the golden syrup. My question is, is there a ratio I can follow to make this using golden syrup without the stickiness? For instance, if a recipe calls for half a cup of corn syrup use only a quarter cup of golden syrup instead? And if I cut down the golden syrup should I replace the remainder with corn syrup or do just the lower amount of golden syrup? I hope my question is clear. Thank you.
Hi Kyle,
First, I’m glad to hear that you made the honeycomb work and that we could help you with that :-)!
Second, your question is a tough one! It’s hard to predict a replacement for these ingredients and I haven’t found good evidence for either method. But I’ll try to explain some thoughts that may help you in your next attempt.
Even though corn and holden syrup may look and appear quite similar, chemically speaking, they’re quite different. Golden syrup is mostly inverted sugar, that is, it’s made up of broken down sucrose (= regular sugar) resulting in a mix of fructose and glucose molecules. These are both small crystals, they don’t crystallize easily and are a lot more prone to stickiness than sucrose.
Corn syrup on the other hand is a mix of a range of components. All of them are starch molecules broken down to different extents. Some have been broken down into glucose completely, whereas others are still quite long chains of glucose (just about all starch is made up of long long chaing of glucose). These long chains especially impact the behavior of corn syrup. It prevents crystallization of sucrose as well, but it’s not as prone to becoming sticky as golden syrup is. Exactly as you found as well.
So, when it comes to replacing them, they both work quite differently and there’s not one general rule that you can/should follow. If you do want to use golden syrup, you most likely will have to reduce the amount of golden syrup you’re using since that is what is making it sticky indeed. You could try working backwards from your initial recipe, so try with half the golden syrup first and see what happens. Don’t substitute with anything else so you can clearly see the effect of the golden syrup. It may well be that it’s tricky to make this honeycomb with any amount of golden syrup, but more likely there’s a maximum amount you can use that still works ok.
By reducing the golden syrup content, you’re increasing the chances of sugar starting to crystallize while you’re making the honeycomb, making it less stable. This is where adding in some corn syrup can help. A good rule of thumb could be to just replace all the golden syrup you took out with corn syrup, but in all honesty, it’s definitely also a matter of just trying it out. Candies like these can be finicky and the final outcome may also depend on your exact process and other sugars you’re using.
Hope these insights help you to continue the development of your honeycomb!
Thank you for writing this amazing article! I’ve attempted honeycomb three times now, today was the best but still sticky (now realise because I’m using golden syrup.) I’m not sure we really have corn syrup in the UK however, I’m going to look.
Your recipe is the one I’m trying next – always trust the science.
My honeycomb is coming out sticky. My previous recipe asked for 1T vinegar which I read in your comments is probably not helping so, this batch I omitted that.
I am letting it cool in the oven at 220 for 10 minutes, then at 170 for 10 minutes. Then, I opened the door and turned the oven off to let it finish cooling.
Another mistake I think I was making was not getting it in an airtight container soon enough. My question is how long does it usually take to get to room temperature? Are we talking an hour? Several hours? I’m curious how soon I can start dipping it in chocolate and get it sealed up.
Hi KJ,
May I ask why you’re letting it cool down in quite a hot temperature for some time? The boiling itself should cook it enough, that you should be able to pour it out immediately at room temperature. As a matter of fact, I’m wondering whether ‘cooling’ it in still quite a warm oven (I’m assuming you’re using Fahrenheit, not Celsius, is that correct?) might be speeding up the stickiness situation? In a warm environment the honeycomb may remain a little softer, it will only turn hard properly once cooled down completely. As long as it hasn’t hardened, it’s easier for it to interact with water and thus become sticky.
When I make honeycomb, I pour it out into a tray immediately after adding the baking soda and let it cool down at room temperature. If I’m making the batch size given above it will probably be about an hour before it has cooled down. Just carefully feel the honeycomb, if it’s lost its heat and it no longer feels warm you can dip it in chocolate.
Keep in mind that it will take shorter to cool if you spread it out more and take longer to cool if it’s in a higher container such as a cake tin.
If you live in a very humid climate, it can be very hard to make non-sticky candy (not just honeycomb, you’ll have issues with other styles also). In those climates the humidity in he air is simply too high to keep it from becoming sticky. Otherwise, leaving it out for a few hours should not give any problems. But don’t leave it overnight, that’s often too long already.
Hope that helps!
Hi there! I’ve been playing around with a recipe similar to this, but that uses gelatin as well. Most of the time during the winter months it works fine but when it starts to get nice out, I’ve noticed it keeps splitting. Would this be due to baking soda?
Hi Maggie,
Honeycomb can be so tricky weatherwise!
During the winter months the humidity is lower. Once it starts getting warmer and better weather, the humidity will go up. That is, there’s more moisture in the air around us, and that moisture can interfere with the honeycomb. Often that can result in sticky honeycomb (especially when you leave it for a little bit).
When you say it splits, do I understand correctly that it splits right at the end? When you add the baking soda?
Baking soda itself does not cause splitting. However, baking soda does create a lot of air bubbles of course, which can make the mixture more unstable. All of those holes are exposed to air and if that air is more humid, the honeycomb is exposed to more moisture in the air. The moisture might interfer with the sugar and cause it to get sticky or even for water to seep out a little. I’d expect the gelatin can help stabilize that a little, but it clearly isn’t doing so sufficiently.
It’s hard to really diagnose, but if I were you I’d try raising the cook temperature be just a few degrees during the nicer days. It reduces the amount of water in the honeycomb so can make it just a little less susceptible to stickiness etc.!
Hope that helps, if I misunderstood something in your problem or have other thoughts, please do let me know!
Hi,
Great article, thanks! I would really like to make maple honeycomb. I’ve tried a couple of recipes but they just don’t come out well. I thought that corn syrup and maple syrup were both inverted sugar and could be used interchangeably but that doesn’t seem to be the case. Do you have any tips on using maple syrup instead of the ones you mention above? What ratios, etc? Many thanks if you are able to help!
Hi Paula,
That’s a great challenge for sure :-). Maple syrup and corn syrup indeed are different. Maple syrup is actually mostly made up of regular sugar (sucrose, the same sugar that refined white sugar is made of) with additional moisture and some minerals. Corn syrup on the other hand is quite different. It contains a mix of carbohydrates, including small sugars as well as larger molecules. It’s these larger molecules that help stabilize honeycomb and prevent preliminary crystallization of sugars. Invert sugar is yet another beast, it’s actually broken down sucrose and is made up of mostly glucose and fructose. Using too much of it in honeycomb can make it excessively sticky.
Personally, I haven’t tried making maple honeycomb. Seeing as how you’re having challenges, I would probably start out by replacing part of the regular sugar with maple syrup and keeping in some of that corn syrup to help with stability. It will require some experimentation since also there can be some variation between maple syrups, causing them to turn out slightly different.
Hope that helps!
Very helpful, thanks Chef Science!
Hi there Chef.
I just made a batch of honeycomb and I’m a little confused about my result. It seems to have separated, the bottom half of the honey comb it not airy at all and is almost white in color, and the top half is close to what honeycomb is supposed to look like. Reading through your responses to previous comments I assume I need less to add less honey, no vinegar, and a little less baking soda. It’s still sticky, and while I can break it it is a little malleable and of course the air pockets are very small. The recipe I used is:
1 Tablespoon salted butter
1 Tablespoon baking soda
1 cup sugar
1 cup honey
Splash of apple cider vinegar
Hi Troy,
Honeycomb can be tricky for sure. Do you recall to which temperature you cooked it?
I would indeed try leaving out either the vinegar or decreasing the honey content since both have similar effects on the candy. Both can make it softer and more sticky. Maybe start with 1/2 cup of honey and 1 cup of sugar, without the vinegar? That’s still considerably more honey than I use in my recipe (approx.: 1 cup sugar = 200g, 1 cup honey = 340g) which could explain some of the stickiness. Also, if the mix is too liquid and doesn’t harden out well, it has problems holding onto air, which might explain that part.
My honeycomb doesn’t contain butter, which doesn’t mean you can’t add any, but that’s probably the one most likely to split from the rest. Your bottom half does sounds like it’s more of a brittle than a honeycomb, which could be due to too much fat, even though you’re using very little. Did you fully melt the butter and stir it in before adding the baking soda?
Hope that gives you some ideas for how to improve your recipe! Let me know if you need more help :-).
Hi
Just wondering why you would add citric acid and when. I know it will react with the bicarbonate and the recipe I had was adding citric acid and bicarbonate together and adding to hot sugar mixture. I thought ig[f you added the citric acid before the bicarbonate while heating it would lower pH and help temperature being reached quicker?
Hi Deb,
Yes, adding citric acid to the end will ensure there’s enough citric acid for the bicarb to do its thing. But it is a bit of a balance to get them both portioned just right.
You can add citric acid earlier, during cooking, however, that will cause some of the sugar to invert. That is, the sucrose (= regular white sugar) breaks down into glucose and fructose. This can make the candy (too) sticky, though it also prevents crystallization from happening (if you want to reduce the corn syrup that’s crucial). Too much inverted sugar won’t be good for your honeycomb, it’s why most recipes won’t add citric all the way at the start, simply too much sugar will break down.
Adding citric acid will lower pH, but it won’t shorten cooking time. You’ll still need to evaporate a similar amount of water.
Hope that helps!